
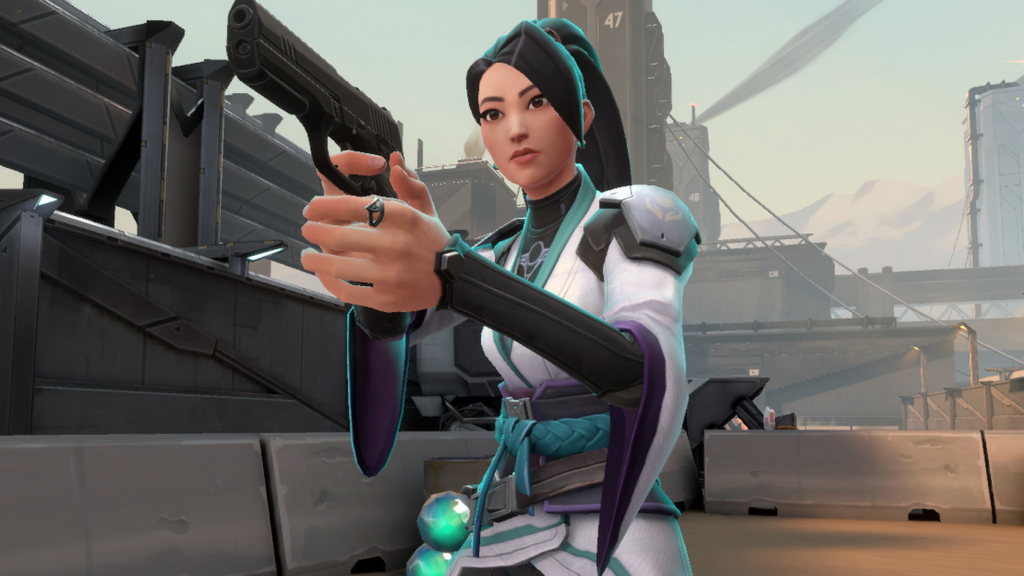
Would you like to try Valorant’s Ice Queen, or do you just want to move up the ranks by doing things yourself? Then the Chinese sentry Sage is the best choice for you.
This Valorant Sage guide will teach you how to use Sage in Valorant and get you started.
A lot of people call Sage “the healer,” but she’s far more than that. It’s pretty simple for the normal player to use her kit, but it’s very hard to unlock all of its potential. She is very useful for many things, so she is a great addition to any team.
Sage Valorant Skills Explained and Explored in Depth
Because Sage is so good at helping her team, she doesn’t like people who are selfish or mean. Sage is the best support Agent because she can lock down parts of the map and bring dead friends back to life.
(C) Barrier Orb
- Cost: 400
- Duration: 30s
- Health: 800 per segment
When Sage puts on a barrier orb, she can build a complete wall of ice around herself. You can turn the orb in any direction after you wear it. Sage’s Barrier is made up of 4 different pieces, or squares, that can be broken one at a time. So, if you block off paths at certain points, the enemy might have to destroy two or more squares to get through. To become a great Valorant Sage, you’ll need to learn this trick.
The most common way to use Sage’s barrier is to block off certain paths so the enemy can’t get through right away or at all. And it does a great job of it most of the time. Her Barrier is one of the best tools in the game. It can be used to protect an entrance to a site when you’re defending or to block off a flank when you’re striking.

Getting yourself and your teammates into better places is the hardest thing you can do with your Barrier, but it may also be the most important thing you can do. You’ll be able to attack enemies from places they wouldn’t expect. While it does take a while to get good at using your Barrier in this way, it’s well worth it once you do. As we already said, her Barrier is pretty pricey, so if you’re not sure where to cast it, it’s best to save it for defense.
Here’s a few God Tier wall placements for you to make use of.
- You shouldn’t miss the chance to use this strong wall placement when hitting B site when you’re playing Ascent. To get clutch views, all you have to do is jump on the big box in B Main and lift yourself up to the windows.
- When playing on the map Haven, putting up your Barrier like in the picture above is the best way to keep enemies out of Garage. When you turn your wall in this way, the enemies have to break through not one but two sections to get in. The enemy probably won’t try to do that, but if they do, they’ll waste a lot of time.
One of the best ways to use your wall is to protect your plants after they’ve been laid. When your enemies try to take back a site, planting the spike at the edge of it and then covering it with your Barrier will make it hard for them. This kind of wall lets you stand back and watch the spike without getting hurt. You can also use your Slow Orb to slow down enemies that are coming from behind.
Sage works really well with characters like Killjoy and Omen. Killjoy and Sage use a mix of utility, boosted players, and turrets to completely stop any effort to get in. Sage can give Omen god boosts that help it get ahead of the competition and completely beat them.
Related: Teamfight Tactics Are a Cross-Platform? Crossplay Guide!

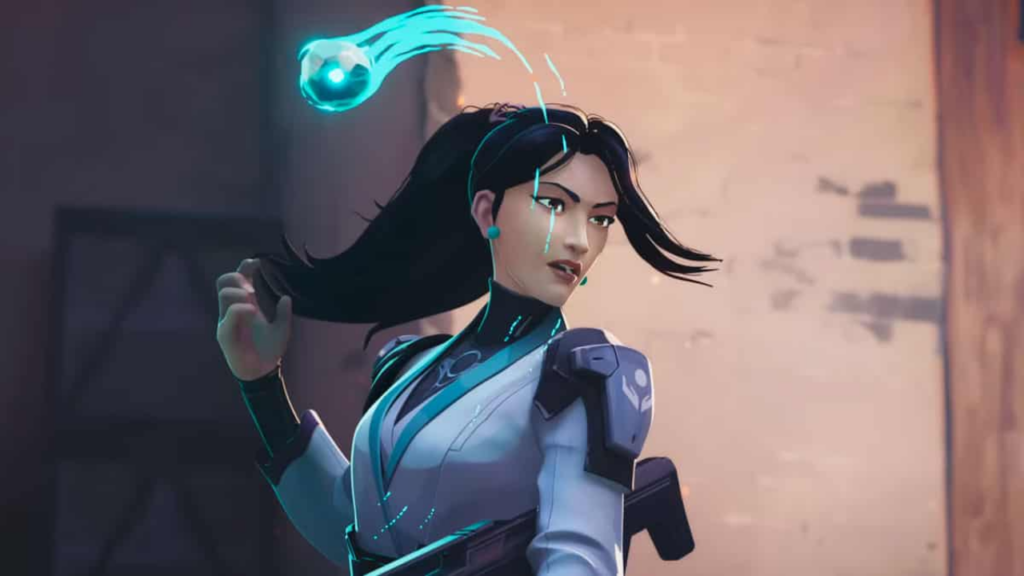
(Q) Slow Orb
- Cost: 200
- Duration: 7s
- Movement slow: 50%
- Jump height reduction: 30%
You get an Orb that you can throw anywhere. When the ball hits the ground, it breaks into pieces that form a field that slows down everyone in its path. After looking at all of Sage’s abilities, her Slow Orb is the one that gets the least attention. That being said, her ultimate and wall are the most important parts of any Valorant Sage game, but her Slow Orb can also be used in a bad way.
The Slow Orb is one of the best ways to stall attacks, especially when used with the Barrier. It is possible for enemies to walk through it, but it will take them a long time and make them easy to kill. You can even put one Slow Orb on top of another to make the effect last longer. When you use destructive skills on your enemies, like Brimstone’s Orbital Strike or Raze’s Showstopper, they will definitely cry.
She can bounce her Slow Orb off of walls, but it won’t work until it hits the ground. Line ups let you throw it from far away, and this lets you slow down the enemy without putting yourself in danger. It’s great after covering the spike post-plant and making it take longer for enemies to get to it.
Related: Queen of Pain Dota 2 Guide: How to Become the Ultimate Queen of Pain in Patch 7.13B?
(E) Heal Orb
- Duration: 5s for allies, 10s on self
- Heal speed: 12HP/s for allies, 6HP/s for self
- Heal pause on hit: 2s
- Amount healed: 60HP
- Cooldown: 45s
Sage puts on an orb that heals. To heal a partner with your orb, press Primary Fire. To heal yourself, press Secondary Fire. You need a clear line of sight to heal a partner, and it takes a while and heals them for a total of 60HP. When Sage’s Heal Orb is on, taking damage will temporarily end its effect. Sage is the only agent who can fix herself and her teammates. This means that you don’t have to depend on other people to help you if you need it.
Do not act without thinking when you want to help others. So, if you see another Phoenix that is only half-health, don’t rush to help him right away because he can heal himself. Always give more attention to friends who can’t heal themselves.
Just like any other healing power, this one is great and helps any team a lot. Being careful when you heal is one of the best Valorant Sage tips. It might not always be a good idea to heal yourself right away if you get hit by enemy fire in a one-on-one battle. Your enemy has enough time to kill you while you’re without a weapon while you arm and cast your Heal Orb. If you can’t hide and heal safely, you should take a chance!
(X) Resurrection
- Cost: 8 ultimate points
- Total animation duration: 3.3s
- Invulnerability duration: 2s
- Vulnerability duration: 1.3s
You can walk up to a dead teammate’s body and bring them back to life when Sage’s Resurrection ability is equipped. Your friend will come back to life with full health after a short channel animation. They will be ready to fight again.
The best Ultimate in the game is Sage’s Resurrection. This skill alone can change the result of any round, which is why Sage is important in almost all games. Still today, Sage is thought to be one of the best Agents because she can bring the dead back to life. Because her ultimate is so strong, some might say that she would still be one of the strongest Agents even if all of her other powers were taken away.
Remember to be careful when you want to use your ultimate. Sage is easy to hit while she’s casting her ultimate, and your partner is easy to hit for a short time after being revived. So, using your ultimate out in the open is a surefire way for the enemy to kill two people.
Before you start to resurrect, make sure there are no enemies nearby. You can either use your Barrier to block off enemies or make sure the enemies can’t see the dead bodies if you revive them. You can also use your resurrect to trick enemies into showing you where they are and then peek to win the battle.

Stand Tall, You Are Valorant
You’ll have to spend a lot of time learning how to make the most of Sage if you want to become a god-like player. Sage is the best choice for the normal player who wants to use safety to move up the ladder, though. Right away, Sage, the beautiful monk, seems pretty simple. But she’s actually more interesting than she seems.
Sage says that she is both a cover and a sword in any team fight. This Valorant Sage guide has enough tips and tricks for you to use them, but it’s up to you to pick them up and do things on your own!
Leave a Comment